My Blog List

Family

Family

The Girls

The Girls

google search

Poppy Seed Fabric

Photobucket
Join  us Saturdays at tatertotsandjello.com for the weekend wrap 
 up           party!
Todays Creative Blog
Tip Junkie handmade projects
kojodesigns
Powered by Blogger.
The Shabby Nest

Search This Blog

create

It's Overflowing

Monday, January 23, 2012

Granola Bar Recipe

I keep things pretty simple around here.
When crafting I use what we have and make it work. 
With recipes I'm the same way. 
When it comes to granola bars you can spend a lot and get a small quantity of good ingredients or you can spend a little and get a lot of bad ingredients. 
I decided to make my own.
When you search for granola bars recipes you find long, expensive, non every day, ingredients. 
But with any recipe I find, I manipulate it to fit what we have in our house on a regular basis. 
I can't say any recipe it truly my own.
I'm not that creative.

This granola bar recipe originally came from 

Delish
Delish

They have a great Granola Bar recipe that uses egg whites and I just didn't want to us eggs so I started to tweak it.

This is what I came up with...


3 C. Quick Oaks (not pictured)
1/2 C. Crisp Rice Cereal
1/3 C. Mini Semi-Sweet Chocolate Chips
1/2 C. Brown Sugar
1/2 tsp. salt
1/2 C. Canola Oil
1/3 C. Honey
1/2 tsp. Vanilla 
1/4 C.  Ground Flax Seed
1/4 C.  Wheat Germ 

I like our granola bars to be long and thin, to fit in our bento boxes, so I use a 13 x 9 inch pan lined with parchment paper to bake them. 

Granola Bars made in 13x9 in pan fits our bentos.

Different size pans will give you different coking times and bar sizes.
You will have to watch your bars baking. 

Mix all ingredients (except chocolate chips).
A wooden spoon works best for mixing.
Mix the ingredients very well and let them sit for 10 minutes. 
This will allow the wet ingredients to soak into the dry. 
You may need to add honey and/or oil if your mixture seems dry after mixing.
Your mixture should clump up a little.
Once you get to this point add your chocolate chips. 
Place the granola mixture into your baking pan (lined with parchment paper).
If you're using a spray... Make sure your baking pan has been sprayed well with non-stick spray!
Press mixture firmly into your baking dish, compacting it well.
I use the back of a measuring cup to do this job, it works well in the corners.

350 degree oven is where they will head for 17 - 20 minutes. 
You will need to keep an eye on them.
Once they start to smell you're getting close. 


They are ready to come out of the oven when the tops are golden brown.
If you take them out too early they will not hold their shape. 
If they cook too long they will get dry. 
This is not rocket science, just keep your eye on them and you'll know.
Make sure they cool completely, so they can set.
I like to make them in the evening and wait until the morning to cut them. 
You can cut them in any shape that you need and fits your child's appetite or lunchbox. 


Store in an airtight container.

I hope you try this recipe and let me know how it turns out.
They also make a great snack for your child's class.

Have fun with substituting the ingredients.
Wheat germ and flax seed is optional.
You can add a spoonful of peanut butter and the recipe still works fine. 
Try instead of the chocolate chips... 
m&m'S
raisins
craisins.

Enjoy! 


Lunch Time

What was for Lunch.... 
Last week's lunchboxes. 
I'm trying my best to mix it up, still need some work. 


I'm excited to share a great Granola Bar Recipe later tonight.
This is a big hit in our house and very popular snack at school.
This is one of my most requested recipes.

I am running to take the girls to ballet. 
I love Mondays.

Saturday, January 21, 2012

Printable Morning and After School Routine Cards

Organized Chaos is the best way to describe my life.
I struggle with finding the balance between trying to be organized and doing too much.
I'm sharing this with you today because a friend of mine who has 3 boys, and a little girl due mid February, showed up at school running late and upset. 
Mornings for most are challenging.
At our house we struggle with getting up and staying on task. 
This is why we needed a morning routine chart. 
My friend's boys are 7, 4 and 2 years old and go to school with my girls. 
She's amazing. 
She's always positive and her boys are as sweet as can be. 
I wonder how she does it. 
  When I saw her upset I knew how she felt and wanted to help. 

I ran home and whipped up some morning routine cards for her boys.  

Morning Routine Cards 

We've tried several systems before finding the one that works best for us. 
If this system isn't your style fell free to make it your own.
You will also be able to find, at the end of this post, a list of some amazing sites that offer other systems.


First, print out the cards. 
You will find all document at the end of this post to download.
I use black ink only because we go through color ink fast around here and it's expensive. 
When I'm using black and white images I will add a pop color with the construction paper/cad stock or coloring in the images by hand.


 Then cut out each individual card and then glued them to construction paper or card stock.  
You do not need to glue them to construction paper or card stock but it will make the card stronger. 
I used the boys favorite colors
Once I choose a color for the name I will keep that color the same in any other additional routine cards or charts.  
Once the cards are glued to the construction paper cut them out, leaving a border of color showing.
I used good old scissors but you can use a paper cutter or punch.  


Time to laminate. 
I have a Scotch TL 901 Laminator.

You do not need a laminator for this.
Before I got our laminator and for larger projects I've used clear contact paper and it works great.
Con-Tact Adhesive Shelf Liner runs about $3 a roll.
Contact Paper Rolls 18X3 Yd Clear
If you're using contact paper you will want to use card stock or a heavy construction paper to help make the card strong and last.


Place the cut and glued cards in laminating pouches.
And send it through the preheated laminator.
If you're using contact paper, sandwich the cards between two pieces. 


 Once the cards are through the laminator, or sandwiched in the contact paper, you will have a pile of sealed (protected) cards.


 Guess What?
You have to cut them out once again. 
I promise this will be the last time. 
You can also use a hole punch that will give you rounded corners to give it that smooth polished look. 
Rounded Corner Hole Punch

And now you will have a pile that looks like this.


To finish the routine board I used Velcro Sticky Back 5/8 in. and Poster Board.
In the past I've used recycled cardboard from gift boxes and cereal boxes for the board. 
Cut the poster board to the size that you want.
I'm one of those that like things symmetrical so this took me a while to measure and cut.  
I glued the laminated names on the boards first. 
Velcro- Sticky Back Dots, 15 Sets White
My favorite 
Remember to keep the same velcro side on the board for each card.
I try to keep the fuzzy (the loop side) of the velcro on the board. 
And the hook side of the velcro on the individual card. 
Keeping this consistent will help when the cards are placed back on the board. 
My girls enjoy putting the cards back on the board at night.
We've made this apart of our night time routine. 


And there you have it! 
I was running late to pick up the little ones and wrapped the finished boards in tissue paper and used yarn to make a pom pom for the bow. 
Not my best work but I knew my friend would be able to use it the next morning.

Last minute tissue wrapped  finished boards.
Fun-Tak, Loctite, mounting putty, is a great way to hang the boards.
The Fun-Tak is strong. This is what we use and it does the trick.
You can change where you display the broads as many times as you need without leaving marks on the wall. 
Great teacher gift.
I've also added an Earned Minutes - Free Time Card (these are our movie tickets). 
You can use them for tv, video games or other reward type activities.
The girls can also save their minutes for a special play dates with a friend... tea party, picnic, craft time, etc.  


Morning Schedule Cards (b&w)


Each morning the girls can earn 10 minutes if they complete the Morning Routine Chart without being prompted. 
Again each card is color coordinated with either Morning Routine Chart.


Earned Minutes or Movie Tickets are a BIG deal in our house. 
Since I'm a stay at home mom we are down to one income and have a tight budget. 
The cable was the first to go. In order to watch tv the girls have to go to their grandparents when they have enough minutes saved. 

10 Minute Card


The grandparents collect the tickets, movie theater style and have their favorite snacks and drink ready.
It's a lot of fun. 


Here are some great sites with other amazing ideas.


http://www.livinglocurto.com

http://edaic.wordpress.com/

Kids' Morning Routine
http://thedisparatehousewife.wordpress.com


I hope this helps make mornings a little less stressful.
If you have any questions please let me know. 
Making

Tuesday, January 17, 2012

Cake Stands and Cookie Displays


Christmas time is always a crafty time of the year. 
I hit the thrift stores during the day while the girls are at school.
And at night my husband and I work on transforming our thrift store finds. 


I love the way everything turned out.  
It was a lot of fun sneaking around and hiding our gifts from the girls.


I was able to sneak in some felt cookies, donuts and tea bags. 
Trying to find the felt goodies at the store was not an easy task.
They didn't fit our style or our budget. 
The felt food turned out to be a lot of fun to make. 
I'm adding it to the list of go to birthday presents. 

Tea for me, too
Homemade felt cookies, donuts and tea bags

E-6000 adhesive was a late night find and ended up saving the cake and cookie displays.
I tried other glues and nothing worked as well as E-6000.  
I picked it up one night at Michael's  before I tried gluing at all and boy was I glad I did. 
I will never use another adhesive for similar projects. 


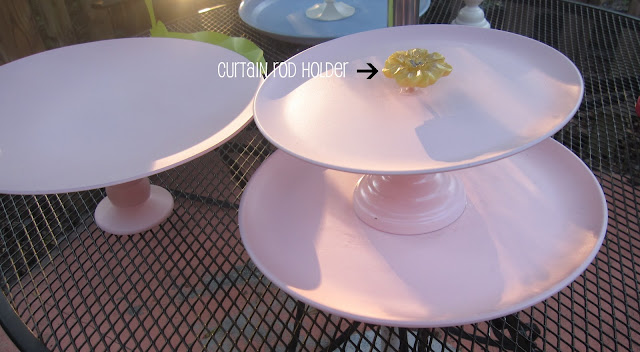
I decided to use a modified cute curtain rod holder for the top of the of the cookie display. 
I drilled a hole in the top plate before painting and assembling the display.
The curved end of the curtain rod holder was cut off and glued in place. 
To save the flower during spray painting, I covered it with aluminum foil.  


I can't wait to make more and share all the details. 

My Favorite App


Rock Soup
One of my favorite apps has to be Instagram
Instagram is great app for taking pictures.
I think it's great for those who struggle with taking a good photo... like me.  
Instagram allows you to alter your pictures, easily, in a fun way that makes your photos look better without changing it too much. 

My other job - Soccer Coach 

I continue to forget to take pictures of what I am doing at a particular moment. 
I remember too late to capture that moment. 
Then I think, "Darn. I should have taken a picture of that."
Instagram makes me want to take more pictures. 
I hope you check out the iphone app and join in on the fun. 

Ice Skating the 1st time

You can follow me on Instagram by finding me @aplacetosew on the app. 


I hope to see you on Instagram and your photos!
Other images from the weekend and another item off the sewing list.
Helping Dad finish the irrigation system
While the girls and the hubby were outside playing and installing our irrigation system I was sewing outside. 
I wish I had a better picture but forgot. 
This is the best one... I'm still getting use to taking pictures. 


I finished cat toys from my fabric scraps.
I hate to waste but I think I need a better way to use my fabric scraps. 
Another item off the list... getting there, little by little.


Lunch Buffet for the workers
The NFL playoff games were on this weekend and the TV came outside with us so we wouldn't miss Tim Tebow and the Denver Broncos while we worked. 
I'm not a Denver Bronco fan but I'm a fan of amazing people.
Tim Tebow is a pretty impressive individual and worthy of moving the TV outside.


Our outdoor lunch buffet had...
a crock pot of hot chocolate
hot chocolate tray with marshmallows and graham crackers
popcorn 
quesadillas
cheese, pepperoni and crackers 


I hope you all had a great weekend.


Saturday, January 14, 2012

Photo of the Day

Roller Skating Fun


I took the girls rollerskating for the first time today.
It's amazing how fast little ones learn new skills. 
The start was a little rocky but by the end they were getting around the rink without a spill and smiling.
What a great day. 
I hope you all had a great one.

Friday, January 13, 2012

Sewing Mad

Thank you, Long Weekend.
The best Fridays are paired with no work or school on Monday.
My sewing to do list is long and is like a wet wool sweater. 
I need to be freed from the old so I can start the new. 
Over the past couple of weeks I've been working on getting the sewing to do to sewing DONE. 
Reusable Snack Bags and Felt Shape Flashcards and Memory Game
For now I have photos and will soon share my tutorial for reusable snack bags and a combo coloring wallet. 
I'm working on taking better pictures. 
So please bare with me. 

Pencil Pouches, tissue holder, wallets, garland and coloring wallet 

Thanksgiving Banner  for a friend 

Halloween Banner for a friend
In my defense the Halloween and Thanksgiving Banners were a request after the holidays. 
I'm not that far behind. 
I'm actually very early. 
The List 
1. Finish Barbie Clothes 
3. Tea Wallets for Teacher Appreciation and Mother's Day 
5. Cat Toys made from fabric scraps

The good news is that we have a long weekend and everything is cut, organized and ready to be put together. 


Please check out the School Lunch Flickr group
Add your lunch ideas and maybe we'll start something big.
Related Posts Plugin for WordPress, Blogger...