My Blog List

Family

Family

The Girls

The Girls

google search

Poppy Seed Fabric

Photobucket
Join  us Saturdays at tatertotsandjello.com for the weekend wrap 
 up           party!
Todays Creative Blog
Tip Junkie handmade projects
kojodesigns
Powered by Blogger.
The Shabby Nest

Search This Blog

create

It's Overflowing

Tuesday, January 31, 2012

Valentine's Day Felt Garland and Streamers

For most holidays and special occasions I try to makeover the girls' room in a fun festive way.
I'll try to transform their room while they're asleep, just to give them a little surprise when they wake up. 
I love the look on their faces when they see everything in the morning.
Hanging Valentine Hearts and Snowflakes
 I used a combination of Valentine decorating ideas and leftover felt to make  a simple, fun and easy room(s) transformation.

Goofy Girls lying on the floor to look at their new decorations.
It takes me forever to decide what I want to create. 
It's difficult to find a project that matches both the materials I already have and the size of our home.
This year for our Valentine's Day decor I used some pinterest ideas and some of my favorite author  Betz White's inspirations.
Betz White's book, Sewing Greenwas one of the first books I checked out of the library when I bought my sewing machine three years ago.
Sewing Green has 25 projects made with re-purposed and organic materials. 
I love the book's photos, her detailed project guides and useful tips. 

Sewing Green: 25 Projects Made with Repurposed & Organic Materials

Betz White has a wonderful way of transforming everyday items into some of the most elegant and practical gifts and treasures.
If you haven't checked out her book or blog you need to hop over there today. 

betz white

Betz White's blog has a list of great Valentine's Day ideas. 
Paper Chain Heart Garland 
Felt Heart Garland 

FELT VALENTINE'S DAY GARLAND
TUTORIAL


I used several different ideas to come up with what works best for our sweet but small home and even smaller budget. 
Last year my daughter's preschool had a Sock Hop. 


I made her a poodle skirt out of felt and so I'm using the remnants from that and other projects for the garland and streamers.  
You can make the hearts for the garland any size you desire. 
I did small ones for our home and larger ones for a friend. 


Start with two felt rectangles.
I used two 4.5 x 15 inch pieces of felt and it made 14 hearts.
Again, use what you have and need.  


Place the two felt pieces on top of each other, align the edges, and sew down one long edge.


Open the sewn felt rectangles.
Then match the other edge of the long side. 

You can start to see the heart take shape. 


Sew down the second long side you just matched. 

When you finish, you will have a felt tube.

If you're a perfectionist you will need to draw lines down your long felt tube 3/4 inch apart. 
This will give you the thickness of your felt heart.
I used blue dash marks in the picture below to show you but you may want to use chalk or a color that will not show in your finished project.  


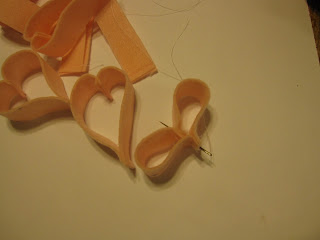
Start cutting on your lines and watch your hearts pile up.


You now have a choice on how you want your hearts to be displayed. 
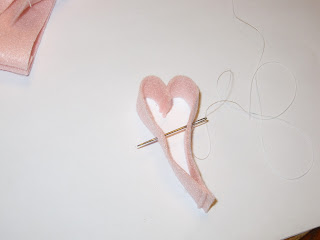
If you want your hearts vertical you will string your needle and thread from the bottom of your hearts to the top. 
I used a bead at the end of my string because it will show when hanging from the ceiling. 


If you want your garland to display horizontally you will need to string your hearts from side to side.


When you have your garland horizontal they have a tendency to flip over.
Betz White offers a great solution to this problem and you can check it out here


For the girls' room I used a combination of felt circles and hearts.
It took me about 15 minutes to cut out the circles and hearts.  

I just sewed the circles together ending each streamer with a felt heart. 
It added a little more color and playfulness that I thought worked in their room. 


Have a Great Day!
I'm off to start on Valentine's Day outfits.

Sunday, January 29, 2012

Photos from the Weekend

Our computer has been down since my last post.
It seems like we have things back to normal. 
I couldn't be happier.
I have a couple of interesting projects to share.
For now I have photos.
Valentine Garland 

The girls woke up Saturday to a decorated room.

Little heart everywhere! We are ready for February 14th. 

The yard getting a needed makeover for the next planting season.

Made a stamp out of puffy letters and a wood block... I love to recycle.

Putting the new stamp to use to make a new banner. 

Outside all day resulted in a vegetarian chili. 

Working on some hair clip and pins for Valentine gifts.
Hope you all had a great weekend.

Monday, January 23, 2012

Granola Bar Recipe

I keep things pretty simple around here.
When crafting I use what we have and make it work. 
With recipes I'm the same way. 
When it comes to granola bars you can spend a lot and get a small quantity of good ingredients or you can spend a little and get a lot of bad ingredients. 
I decided to make my own.
When you search for granola bars recipes you find long, expensive, non every day, ingredients. 
But with any recipe I find, I manipulate it to fit what we have in our house on a regular basis. 
I can't say any recipe it truly my own.
I'm not that creative.

This granola bar recipe originally came from 

Delish
Delish

They have a great Granola Bar recipe that uses egg whites and I just didn't want to us eggs so I started to tweak it.

This is what I came up with...


3 C. Quick Oaks (not pictured)
1/2 C. Crisp Rice Cereal
1/3 C. Mini Semi-Sweet Chocolate Chips
1/2 C. Brown Sugar
1/2 tsp. salt
1/2 C. Canola Oil
1/3 C. Honey
1/2 tsp. Vanilla 
1/4 C.  Ground Flax Seed
1/4 C.  Wheat Germ 

I like our granola bars to be long and thin, to fit in our bento boxes, so I use a 13 x 9 inch pan lined with parchment paper to bake them. 

Granola Bars made in 13x9 in pan fits our bentos.

Different size pans will give you different coking times and bar sizes.
You will have to watch your bars baking. 

Mix all ingredients (except chocolate chips).
A wooden spoon works best for mixing.
Mix the ingredients very well and let them sit for 10 minutes. 
This will allow the wet ingredients to soak into the dry. 
You may need to add honey and/or oil if your mixture seems dry after mixing.
Your mixture should clump up a little.
Once you get to this point add your chocolate chips. 
Place the granola mixture into your baking pan (lined with parchment paper).
If you're using a spray... Make sure your baking pan has been sprayed well with non-stick spray!
Press mixture firmly into your baking dish, compacting it well.
I use the back of a measuring cup to do this job, it works well in the corners.

350 degree oven is where they will head for 17 - 20 minutes. 
You will need to keep an eye on them.
Once they start to smell you're getting close. 


They are ready to come out of the oven when the tops are golden brown.
If you take them out too early they will not hold their shape. 
If they cook too long they will get dry. 
This is not rocket science, just keep your eye on them and you'll know.
Make sure they cool completely, so they can set.
I like to make them in the evening and wait until the morning to cut them. 
You can cut them in any shape that you need and fits your child's appetite or lunchbox. 


Store in an airtight container.

I hope you try this recipe and let me know how it turns out.
They also make a great snack for your child's class.

Have fun with substituting the ingredients.
Wheat germ and flax seed is optional.
You can add a spoonful of peanut butter and the recipe still works fine. 
Try instead of the chocolate chips... 
m&m'S
raisins
craisins.

Enjoy! 


Lunch Time

What was for Lunch.... 
Last week's lunchboxes. 
I'm trying my best to mix it up, still need some work. 


I'm excited to share a great Granola Bar Recipe later tonight.
This is a big hit in our house and very popular snack at school.
This is one of my most requested recipes.

I am running to take the girls to ballet. 
I love Mondays.

Saturday, January 21, 2012

Printable Morning and After School Routine Cards

Organized Chaos is the best way to describe my life.
I struggle with finding the balance between trying to be organized and doing too much.
I'm sharing this with you today because a friend of mine who has 3 boys, and a little girl due mid February, showed up at school running late and upset. 
Mornings for most are challenging.
At our house we struggle with getting up and staying on task. 
This is why we needed a morning routine chart. 
My friend's boys are 7, 4 and 2 years old and go to school with my girls. 
She's amazing. 
She's always positive and her boys are as sweet as can be. 
I wonder how she does it. 
  When I saw her upset I knew how she felt and wanted to help. 

I ran home and whipped up some morning routine cards for her boys.  

Morning Routine Cards 

We've tried several systems before finding the one that works best for us. 
If this system isn't your style fell free to make it your own.
You will also be able to find, at the end of this post, a list of some amazing sites that offer other systems.


First, print out the cards. 
You will find all document at the end of this post to download.
I use black ink only because we go through color ink fast around here and it's expensive. 
When I'm using black and white images I will add a pop color with the construction paper/cad stock or coloring in the images by hand.


 Then cut out each individual card and then glued them to construction paper or card stock.  
You do not need to glue them to construction paper or card stock but it will make the card stronger. 
I used the boys favorite colors
Once I choose a color for the name I will keep that color the same in any other additional routine cards or charts.  
Once the cards are glued to the construction paper cut them out, leaving a border of color showing.
I used good old scissors but you can use a paper cutter or punch.  


Time to laminate. 
I have a Scotch TL 901 Laminator.

You do not need a laminator for this.
Before I got our laminator and for larger projects I've used clear contact paper and it works great.
Con-Tact Adhesive Shelf Liner runs about $3 a roll.
Contact Paper Rolls 18X3 Yd Clear
If you're using contact paper you will want to use card stock or a heavy construction paper to help make the card strong and last.


Place the cut and glued cards in laminating pouches.
And send it through the preheated laminator.
If you're using contact paper, sandwich the cards between two pieces. 


 Once the cards are through the laminator, or sandwiched in the contact paper, you will have a pile of sealed (protected) cards.


 Guess What?
You have to cut them out once again. 
I promise this will be the last time. 
You can also use a hole punch that will give you rounded corners to give it that smooth polished look. 
Rounded Corner Hole Punch

And now you will have a pile that looks like this.


To finish the routine board I used Velcro Sticky Back 5/8 in. and Poster Board.
In the past I've used recycled cardboard from gift boxes and cereal boxes for the board. 
Cut the poster board to the size that you want.
I'm one of those that like things symmetrical so this took me a while to measure and cut.  
I glued the laminated names on the boards first. 
Velcro- Sticky Back Dots, 15 Sets White
My favorite 
Remember to keep the same velcro side on the board for each card.
I try to keep the fuzzy (the loop side) of the velcro on the board. 
And the hook side of the velcro on the individual card. 
Keeping this consistent will help when the cards are placed back on the board. 
My girls enjoy putting the cards back on the board at night.
We've made this apart of our night time routine. 


And there you have it! 
I was running late to pick up the little ones and wrapped the finished boards in tissue paper and used yarn to make a pom pom for the bow. 
Not my best work but I knew my friend would be able to use it the next morning.

Last minute tissue wrapped  finished boards.
Fun-Tak, Loctite, mounting putty, is a great way to hang the boards.
The Fun-Tak is strong. This is what we use and it does the trick.
You can change where you display the broads as many times as you need without leaving marks on the wall. 
Great teacher gift.
I've also added an Earned Minutes - Free Time Card (these are our movie tickets). 
You can use them for tv, video games or other reward type activities.
The girls can also save their minutes for a special play dates with a friend... tea party, picnic, craft time, etc.  


Morning Schedule Cards (b&w)


Each morning the girls can earn 10 minutes if they complete the Morning Routine Chart without being prompted. 
Again each card is color coordinated with either Morning Routine Chart.


Earned Minutes or Movie Tickets are a BIG deal in our house. 
Since I'm a stay at home mom we are down to one income and have a tight budget. 
The cable was the first to go. In order to watch tv the girls have to go to their grandparents when they have enough minutes saved. 

10 Minute Card


The grandparents collect the tickets, movie theater style and have their favorite snacks and drink ready.
It's a lot of fun. 


Here are some great sites with other amazing ideas.


http://www.livinglocurto.com

http://edaic.wordpress.com/

Kids' Morning Routine
http://thedisparatehousewife.wordpress.com


I hope this helps make mornings a little less stressful.
If you have any questions please let me know. 
Making
Related Posts Plugin for WordPress, Blogger...